Step 1 - Have a new cord color that needs to be added.
Step 2 - Take a picture of that cord, preferably with a background that stands out from the colors in the cord and with good lighting.
Step 3 - Crop the picture in Photoshop so you just have the tassel and a few inches of cord. Get rid of the background, like this -
Step 4 - Make sure colors in image match colors when the cord is observed manually.
Step 5 - Insert picture into graduation-cordsSelect.psd, following the current folder standards in the file so it is just like everything else.
- If new rows are needed, each row is 250px tall (image > canvas size > anchor top-middle).
- Each row gets a new row folder, and cords progress from top to bottom in that folder as they progress from left to right in the image.
- The overlay layer (gray bar behind text) needs to be copied and pasted into the appropriate place on the new row and then merged with the current overlay layer.
- Titles in cords names folder should follow existing standard.
Step 6 - Save graduation-cordsSelect.psd as a psd and then save for web (alt + ctrl + shift + s) as graduation-cordsSelect.jpg.
Step 7 - Download this script and save it to your desktop. Open notepad and use it to open and edit the script.
Step 7.1 - Copy the last color block and then paste it below itself so it is now both the last color block and the last color block -
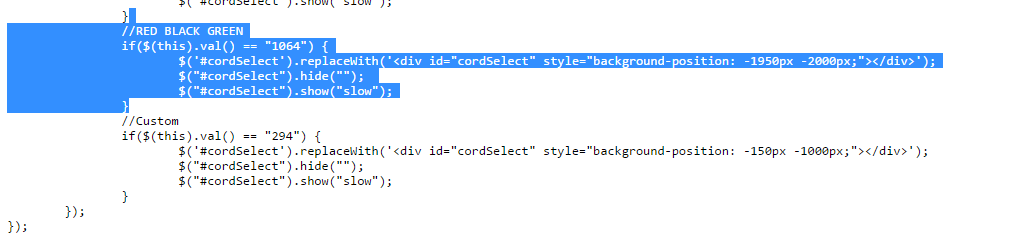
becomes...
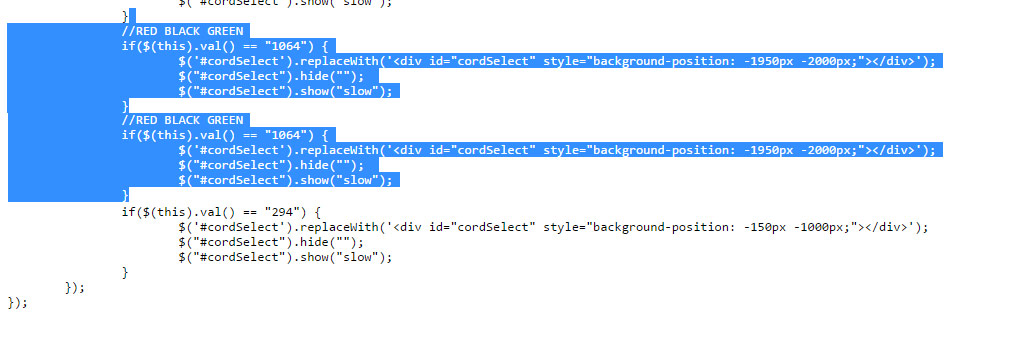
Step 7.3 - Replace the //COLOR OF LAST CORD with //COLOR OF THIS CORD keeping in mind that colors like Light Blue or Royal Blue are abbreviated LBLUE or RBLUE.
Step 10 - Add the color to 1st, 2nd, and 3rd cord color attribute drop downs here.
Step 11 - Make sure that you click and drag the attribute so it is positioned alphabetically in all three lists. Save all three lists.
Step 12 - Go to the product pages, the edit tab, then the options subtab (e.g., here) and at the bottom of each attribute group you will see newly added attributes. Check the box and drag and alphabetize all over again. Do this for all three cord products and, for double and single cords, each attribute group.
Next Step - Do not ever, on your life, touch or visit or edit anything on this page https://www.honorsgraduation.com/order/node/16/edit/attributes. If you are unfortunate enough to go there, I've set a script to render it 'safe' but you never know what mischief you could get yourself into.
Then (single cords only) - Go to the adjustments subtab and find your newly added cord, update the alternate SKU according to rules that should be obvious by now (RBLUE instead of Royal Blue).
Step 15 - Load the single cord product page in your web browser. Right click > View page source (or something like it).
Step 16 - Find the HTML for the checklist (ctrl + f and enter 'please select' or see image below).
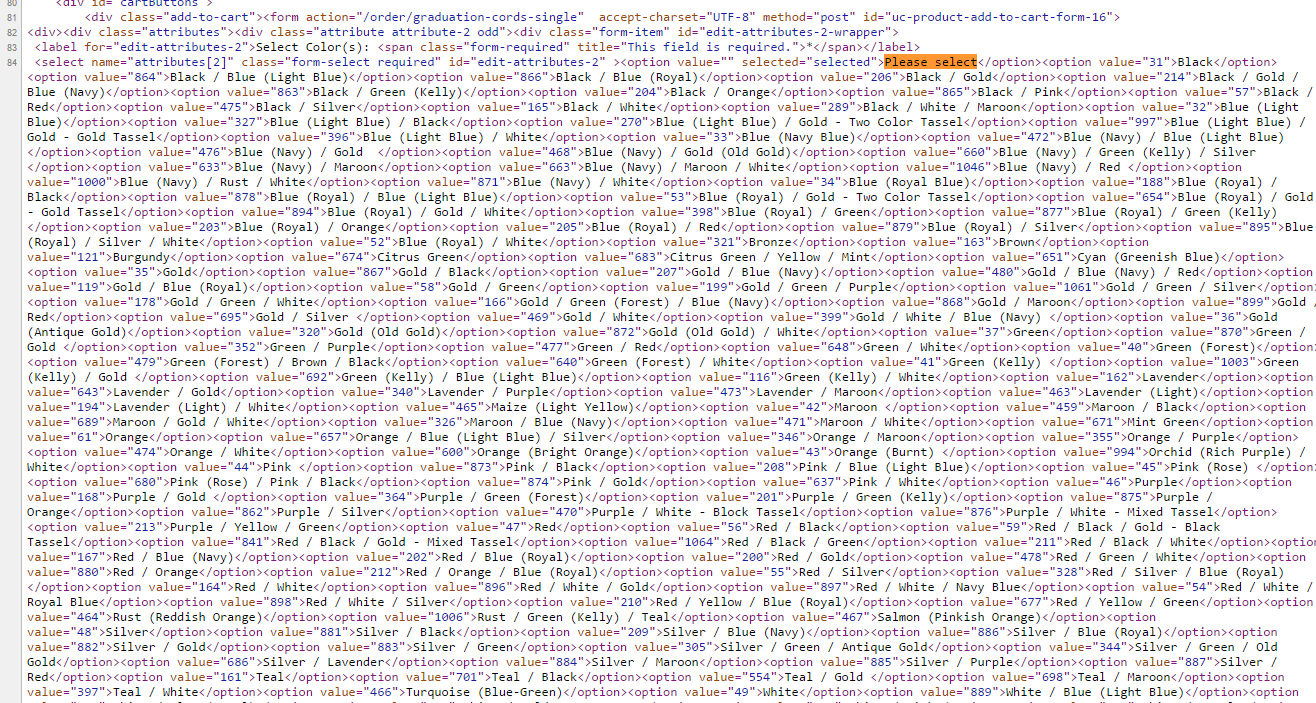
Step 17 - Find the option value number that immediately precedes your newly added color. Go back to your script and replace the number in the .val() == "SOMENUMBER" bit with your value. Make sure you are editing your new color, and not some other color.
Step 18 - In the next line, replace the background-position: -SOMENUMBERpx -SOMENUMBERpx; bit with the px (aka pixel) coordinates from the Photoshop file. The first coordinate is horizontal (side to side) and the second is vertical (up and down).
- If you don't see a ruler, open up Photoshop and hit ctrl + r.
- If your ruler doesn't show pixels, go to edit > preferences > units and rulers, and under rulers choose pixels.
I think the ruler defaults to inches, so make sure to check that your first time.
Step 19 - Save the script, then send the saved script psd, and jpg to my gmail.
Step 20 - Pop open the a-z cords psd files and rearrange them or create new ones so the new colors are accommodated into those files. Save any of these files you've edited in any way (psd and jpg) and send them to my gmail.
Step 22 - Profit!